
 00:00:00
At the youth hockey level, I have all but abandoned the idea of “special teams” and no longer assign anyone to power play or penalty kill lines. Through various levels and age groups I have gone back and forth and found that for best development and even fairness, just rolling the next line (and of course having to adjust for PK units) works best and gives everyone the ability to develop as players in different scenarios.
With that, I also don’t focus much on power play strategy outside of teaching them through drills to control the puck and finding shooting lanes. Giving them the chance to find out what works and what doesn’t.
However, on the penalty kill, I have taken a slightly different approach. It’s not that I have gone too deep on strategy on how to execute the perfect box, or how to stop all goals when trapped in the zone. It’s that I have decided my team is going to be best when we’re dangerous on the PK, and don’t reserve ourselves to being stuck in the zone.
Instead, we execute a power kill, and carefully control the play generating offensive chances. We’ve worked on the art of executing our breakout and breakin with just four players and are not afraid to take the chances when given to us.
It’s made us a more dangerous team to play when we go down a man because teams don’t expect it.
To get there, we run a few basic drills to build player confidence being down a player, and then work on things like our breakout with fewer forwards so they aren’t always relying on an off-wing player to be there.
Drills created with Hockey Coach Vision.
2 on 3 Drill
In this drill, you run a 2 on 3, where the two forwards attack the net against three defenders. This is the same drill I have used to teach defense how to collapse and trap players in the zone, but it works wonderfully with a focus on offense as well. It forces the forwards to get more creative with finding ways to get each other the puck and create scoring chances.
4 on 2 Breakout
Here, you’re not playing the drill shorthanded, but rather, teaching your players how to execute a clean breakout with 4 players. As the players get better and better, a good way to keep layering this drill is to add more defenders.
Four players skate in to break the puck out with pressure from 2 defenders.
One defender should put immediate pressure on whoever is getting to the puck first while the second should be helping remove passing lanes.
Ideally, your defenders move the puck to the weak side of the ice where the winger takes the pass and moves it quickly to the center driving out. The 4 players breaking out should then try to score on the center ice net.
Blow the play dead once they have a scoring chance, or in the worst case, the 2 defenders get control and create their own scoring chance.
4 on 0 to 3 on 2
In this drill, the team continues working on a four person breakout, and then three forwards enter the zone against two defenders. Again, the attacking team is not shorthanded, but on a well executed breakout, you won’t be skating into 5 players. Instead, this one has three players entering against one defender and one backchecker.
It begins with four players working together, and then turns into a 3 on 2. You get a lot of teamwork, then a lot of competition.
All four players enter the zone for a breakout, working together to gain the blue line. Once outside, the play turns back and the three designated forwards attack the net while the first player who played the puck plays defense inside the zone, the defenseman up high then provides the backcheck, giving pressure to the forwards, making it feel much more game-like.
Outside of drills, we instill smart habits on our forwards. If they get the puck into the zone on a dump, only 1 player will apply pressure, if we can create a turnover or gain possession, others will begin to join. We don’t want to get caught with too many players deep if we don’t have the puck.
With USA Hockey not allowing icing from the shorthanded team, this also ensures we always gain the red line before deciding to enter the zone or send the puck in. This means we’re always working on the breakout on the PK because we can’t afford to get the puck out of the zone without control.
With these drills, we have begun scoring more shorthanded goals then we often score on the power play. As I said earlier, most teams are caught off guard by our aggressive PK and these drills have instilled the confidence needed to go out and dominate when most teams turtle back into their shells.
3D Animated Drills are powered by the Hockey Coach Vision App. Test the FREE HCV APP and access 100+ Animated Drills: https://hockeycoachvision.com/

 0:01:32
Smart Puck Placement
- F1 hunting the Puck
- F2 Sealing the Wall
- F3 Middle
- F3 reacting on D to D Reverse
- OZone Dot to Dot Support
 0:00:50
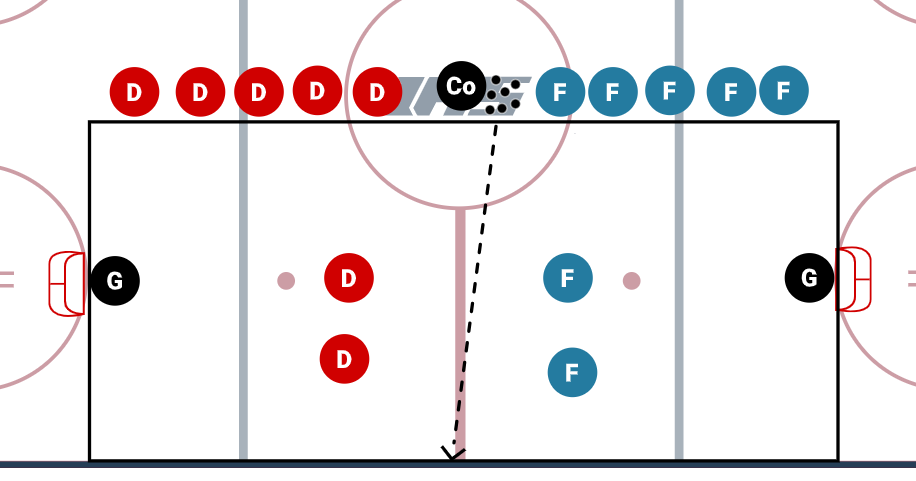
Set up: roughly tops of circles on both sides, with players from each team divided in half on both sides. In video, half of team black and team red with coach on one circle, the other half of each team lined up with the coach on the other circle.
- Coach 1 spots a puck, 1v1 race and retrieval, winner must add 2nd player in line to make it a 2v1 to the net (quick attack)
- On whistle, those 3 players must tag up by touching boards, and coach 2 spots a puck in their corner to start 1v1 on the opposite side.
- Same process, 1v1 battle, goal is to add another player from the line. The 3 players who tagged up can now join the game on the other side to make it a 3v3 or 4v2 depending on who wins the race to Coach 2's puck
- See video
Key Teaching Points
- body positioning, deception, and turning feet on puck retrievals (player racing for puck 1 in video shows this and puts themselves in a dangerous spot)
- creating a passing lane as the puck carrier
- identifying whether to attack or possess based on 3v3 vs 4v2 outcome
- stick and body positioning on D
- movment off the puck and puck support
 0:00:55
Key Teaching Points
- Knee and ankle bend
- Strong push-free leg is controlled/locked and pointed
- Rotation into the turn
- Stay balanced throughout the turn.
 00:00:00
Repetition Without Repetition
We now reach the final environmental design principle to support an ecological dynamics approach to skill development. In part 2 we looked at the importance of session intention. Part 3 provided details and background on the use of a constraints led approach as an impactful development and teaching method, and in part 4 we dove into representative learning design. That now brings us to the concept of repetition without repetition.
As you read the series of articles it becomes apparent how connected these three design principles are to one another. Ignore any one and you are left with a void and an impact on your ability to implement or follow an ecological dynamics approach. Repetition without repetition is no different. It is very much connected with representative learning design.
Let us look at the two videos below to illustrate this concept.
In this first video I am working with a player using an unopposed and isolated setup to develop their ability to play off the wall and attack the net. As you can see, I have removed any pressure from defenders. The player has no decisions to make or problems to solve. I told them exactly what I wanted them to do (i.e. I gave them the solution) and they repeat the action(s), trying to do it the same way on each repetition, and following the same pattern. The focus in this drill is on creating a repeatable technique/solution and I am using repetition with repetition to achieve that.
In this next video I am working on the same skill, the player's ability to play off the wall and attack the net. In this setup I am using a more representative learning design. I have included opposing players, and I now provide an objective rather than a solution to the player. The focus is not on a repeatable technique. The focus is on repeating the creation of finding solutions to the problems being presented by opposing players and the limited space to act in. The solution does not need to be the same all the time. In fact, we want them exploring new solutions and multiple solutions. Instead of repetition with repetition, I am now using repetition without repetition. It is important to note though, that with this approach improvements in technique can still be acheived.
In traditional, linear approaches the use of repetition is directed towards actions and their repetition in the same way, repetition with repetition. In non-linear approaches repetition is directed toward finding solutions and being able to repeat the search for varying solutions of the same problem. There is repetition, but that repetition can feel and look different each time. Players are performing reps in search of solutions to the problem being presented.
The game of hockey is repetition without repetition. How Connor McDavid solves the problem of being contained along the boards in limited space can differ in a dozen ways. In any single game he may be faced with that scenario 100 times. Therefore, he is going to get one hundred or more reps. In each rep he is not repeating the exact same technique trying to do it perfectly, but rather he is repeating his search for the best solution at that time based on his perceptions.
Impact on Skill Development
If you accept the definition of skill as a decision-making, problem-solving quality then the use of repetition without repetition in activities in our practice and training sessions becomes mandatory. Based on this definition, to become skillful requires players to be exposed to problems and be allowed to repeatedly search for solutions to those problems. Designing repetition without repetition into practice activities within a RLD addresses that very requirement. But designing repetition without repetition into practice sessions also provides the following key requirements for developing skilled players:
1. Exploration and Discovery - creates flexibility and unstructured progression which in turn contribute to players developing the freedom to search our solutions and the comfort to fail.
2. Variability - within these activities players are rarely presented with the same conditions in consecutive reps. The dynamics of the game context are ever present thus creating a variability that promotes finding new solutions to the same problem.
3. Questioning - given the nature of these activities and environments coaches cannot provide the solution to their players. Therefore, some of the typical correction and feedback methods are not effective. Coaches must support the players exploration and discovery with questioning as a teaching tool, thus preserving the exploration and variability.
Part 4 - Representative Learning Design
References
- Renshaw, I., Davids, K., Newcombe, D., Roberts, W. (2019). The Constraints Led Approach: Principles for Sports Coaching and Practice Design. London: Routledge
- Gray, R. (2021). How we Learn to Move: A Revolution in the Way we Coach and Practice Sports Skills. United States: Perception Action Consulting & Education LLC
- Gray, R. (2022). Learning to Optimize Movement: Harnessing the Power of the Athlete-Environment Relationship. United States: Perception Action Consulting & Education LLC
- Chow, J.Y., Davids, K., Button, C., Renshaw, I. (2016). Non-Linear Pedagogy in Skill Acquisition: An Introduction. London: Routledge
- Attri, R.K. (2018). The Models of Skill Acquisition and Expertise Development. Singapore: Speed to Proficiency Research
- Nash, C. (2022). Practical Sports Coaching 2nd Edition. London: Routledge
- Button, C., Seifert, L., Chow, J.Y., Araujo, D., Davids, K. (2020). Dynamics of Skill Acquisition: An Ecological Approach.
 0:01:01
Beat the Forecheck
- Quick Transition
- Beat the Forecheck by wheeling the puck up
- First FW back be an option
- By moving the puck quick - beat F3
- Create Ice on the Rush - pushing back the D-man
- Carry the puck inside the dots through Neutral Zone
- Kick out and create outside support on Entry
- Drive the far post
 0:00:16
One of the biggest issues with most teams is that they pass too hard and only go tape-to-tape... as I've explored (link to that background piece) in the past, the best players and teams use more area passes than others.
I've struggled for years to come up with activities that help develop touch on their passes within game context and encourage more area passes. This simple, yet effective activity/drill is the one I've found most effective. This helps guide players toward seeing possibilities beyond tape-to-tape passes. I have an area pass warm-up activity to help prime and develop these passes at the bottom.
2V2 AREA PASS SMALL-SIDED/AREA GAME
Constraints:
- The Small Area is half-ice and is longer rather than wider. This gives space to lay area passes into and having the wall close also allows for banked passes.
- Scoring wise award 2 points for any goal that comes from an area pass.
- Play games to 4 goals and have reward/consequence (eg. losing team skates a hard lap or pushups)
- Play out each 2v2 for 20-30 seconds. Have the players not in the 2v2 stand along the outside border to keep pucks in and contain play.
- If a puck goes over the goal line (top of the circles in this case), the coach spots a new puck or calls for a rotation of the next 2v2.
AREA PASS WARMUP
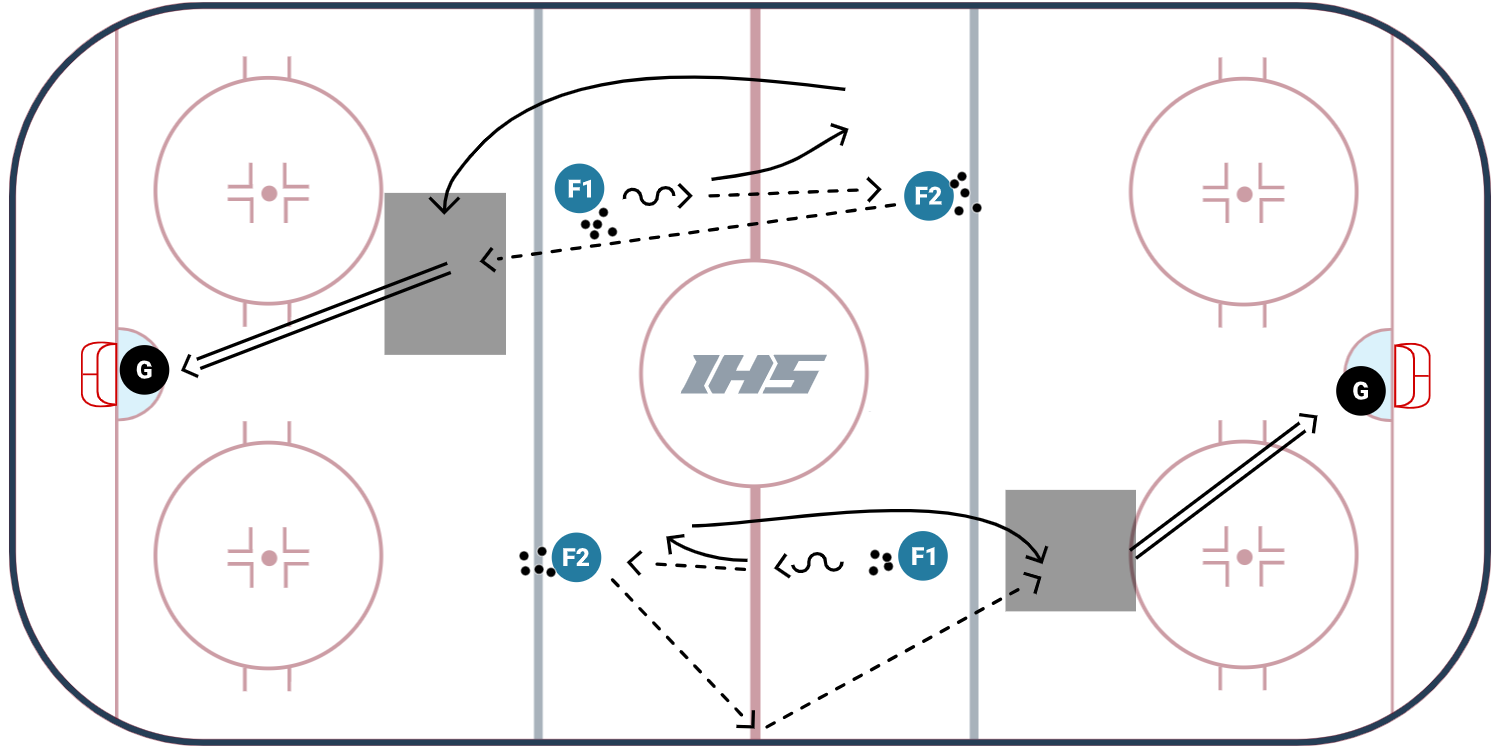
I like to use this warm-up activity to prime and help activate their area passes/touch. Here is how that warmup activity works:
- Players line up on the Neutral Zone (NZ) faceoff dots facing each other. Opposite lines go at the same time.
- The player (F1 below) with the puck skates toward the line opposite of theirs and passes the puck.
- The player that passed the puck transitions facing the puck either inside or outside and skates back up the ice toward their beginning line.
- The player (F2 below) receiving the pass makes an area pass opposite of the direction the player transitioned.
- The player skating onto the puck goes around the end of their line to meet the puck on the other side.
- Bank off the boards if the player transitions toward the middle of the ice.
- Soft pass, just off the line, to the middle of the ice if the player transitions toward the boards.
- The goal is for the puck and player to meet directly over the blueline/behind the original line the original puck carrier came from.
- Finish with a quick 2-touch or soft catch shot from distance.
 00:00:00
Warmups are all about simple drills to get the feet and body going before a game. Below are two drills I have done with my team in practice and in the warmup before games.
These drills can be used at any level.
DRILL ONE:
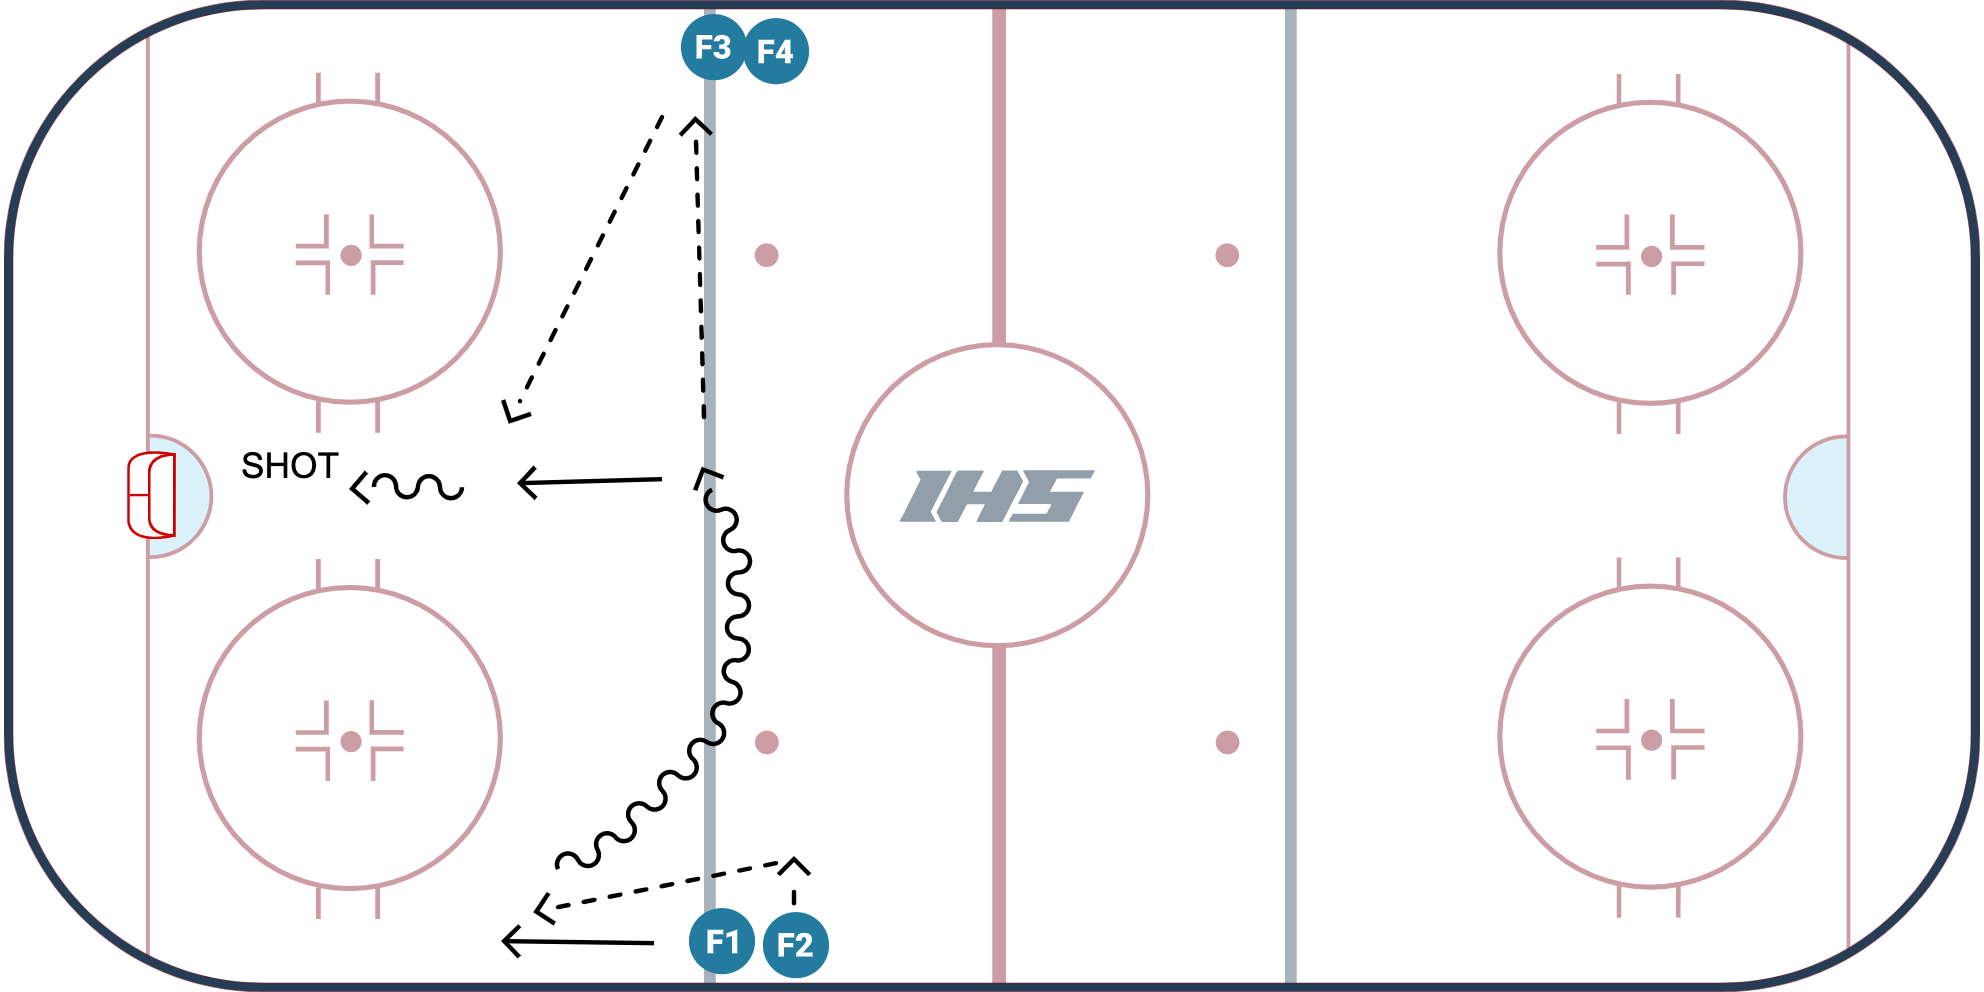
The first drill here is a simple backward-to-forward drill with passing and shooting. This is a rotating drill so each side will rotate through the same drill. Start by dividing the players into two groups and putting each group on different sides of the blueline.
- F1 will start without the puck skating backward to about the top of the circle.
- Once F1 is close to the top of the circle, the next player(F2 in this diagram) in line will make a pass to the backward player(F1).
- When F1 receives the puck from F2, he/she will skate to and around the blueline.
- About halfway across the blueline, the player with the puck will make a cross-ice pass to the first player in line(F3 in this photo).
- F1 will then cut into the high slot area looking for the pass from F3. Once F1 receives the puck back, the player will take a shot and get back in line.
- The drill will then start again, but on the other side, this time with F3 starting backward, receiving the puck from F4.
- The drill will continue and rotate.
DRILL TWO:
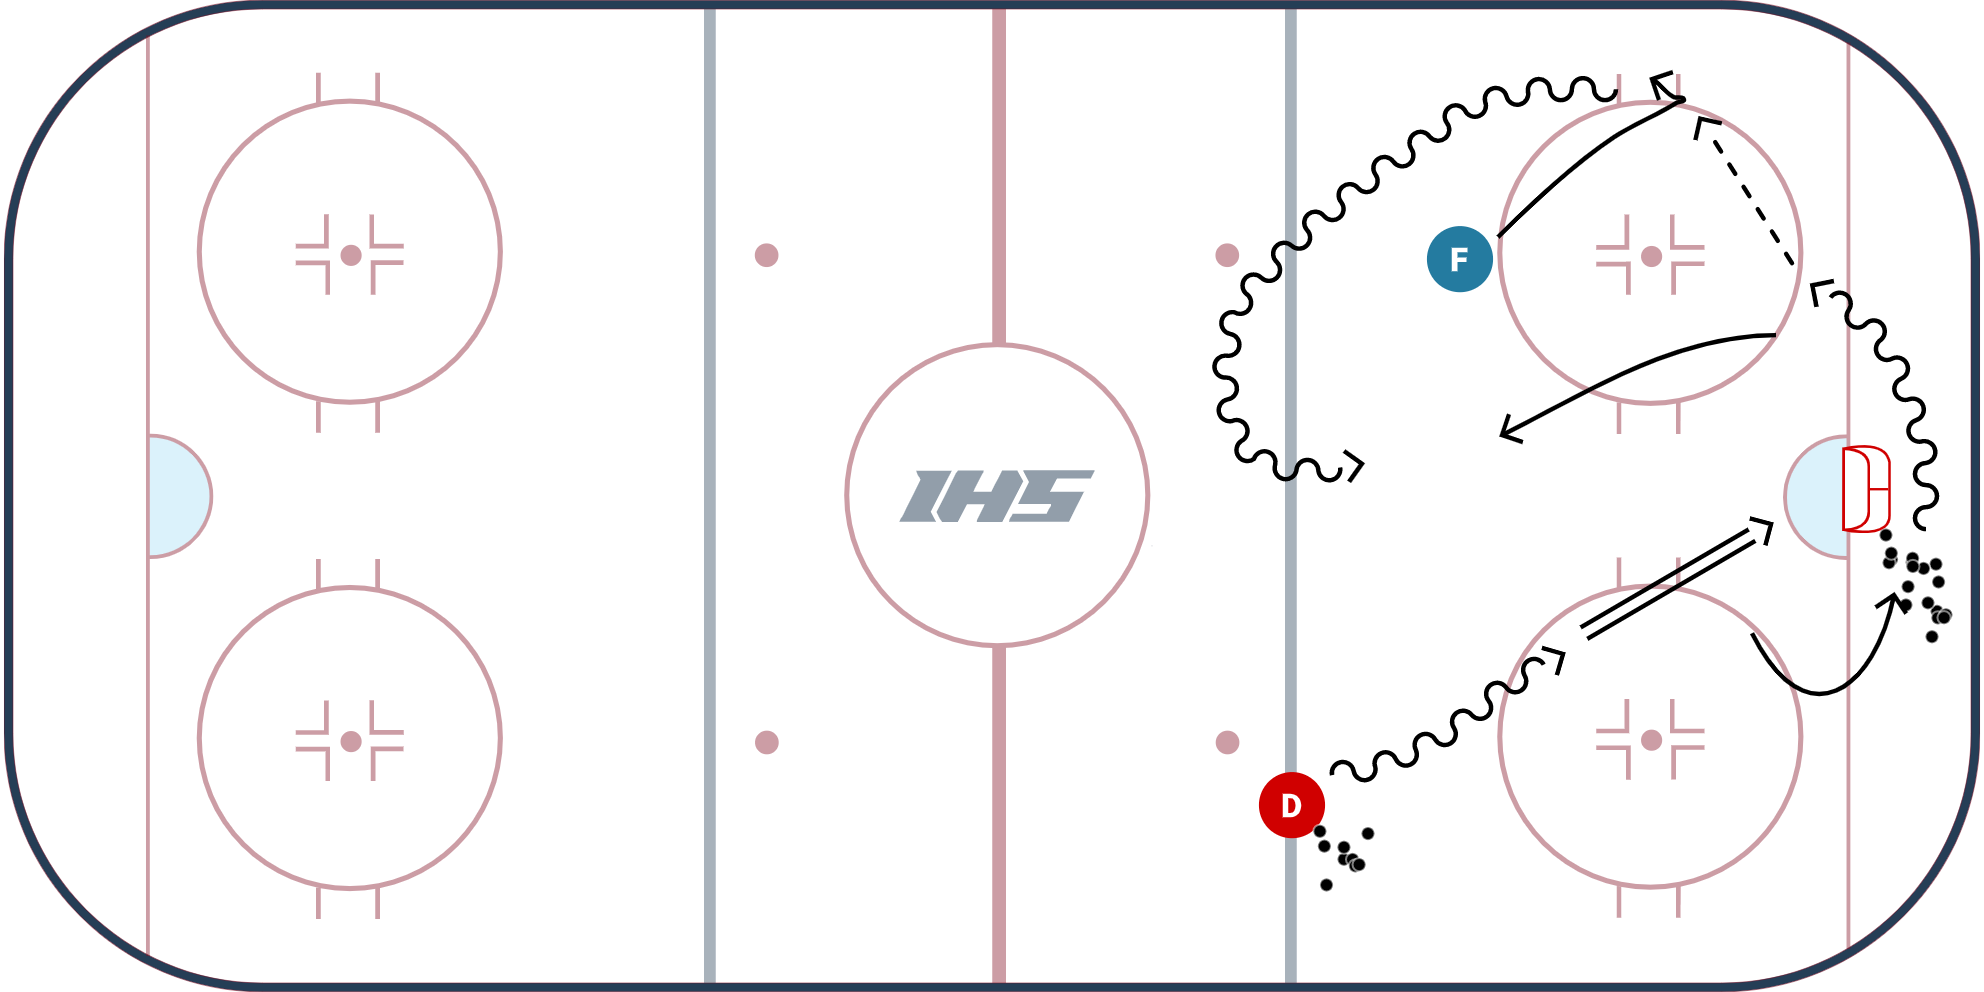
Drill two is an easy drill to implement in your warmup or practice plan to work on transition play along the boards and a one-on-one battle.
- All the defenseman will be placed at the blueline, while the forwards will be placed in a line, on the opposite side, by the top of the circle.
- The first defenseman in the line will skate into the zone with a puck and take a shot on goal.
- Once the defenseman takes their shot, they will then go behind the net(where there will be a group of pucks) and grab a puck.
- The first forward in the line will wait for the defenseman to take a shot on net and start creeping to the bottom of the circle. The forward will transition backward opening up for a pass from the defenseman behind the net.
- When the forward receives the pass from the defenseman, the forward will skate up ice and curl back to the offensive zone around the blueline.
- After the defenseman makes the pass to the forward, the defenseman will get in position to defend the oncoming forward with the puck.
- This will end up being a one-on-one.
I hope anyone who sees these drills will maybe add them to their plans! If you have any questions please feel free to reach out.
 00:00:00
Rat Race - This can be set up and done anywhere on the ice. X1 starts on ringette line. X2 on blue line. Both go on command, race around the net (give a little extra space behind net). X1 is forced to pick up the puck on the fly and carry it around the cone with X2 chasing/pressure/backchecking. If the gap is too wide, space them at the start accordingly.
offensive KTP: Quick feet, quick starts. Tight turns. Picking up puck in motion/not slowing down. Puck Protection. Quick Shooting
defensive KTP: Quick feet, quick starts. Tight turns. Backchecking. Cause pressure. Stick checks/takeaways, etc. DO NOT GIVE UP.