Kick Back Rep #2
In motion perform a euro turn
Inside foot grabs outside edge, can't be on flats.
With good ankle flexion outside edge pops off ice while outside foot comes under hip back to starting point.
 0:00:10
Kick Back Rep #2
In motion perform a euro turn
Inside foot grabs outside edge, can't be on flats.
With good ankle flexion outside edge pops off ice while outside foot comes under hip back to starting point.
 0:00:17
Kick Back Rep #3
On forward inside and outside edges.
lock F outside edges in ice and with good ankle flexion pop off ice while opposite foot lands on backwards inside edge.
Repeats all the way down the ice.
 00:00:00
The #1 reason is simple — they don’t challenge the middle of the ice.
Instead, players stay along the boards, take low-percentage shots, and make themselves easy to defend. The middle of the ice is where the best scoring opportunities happen — but most players avoid it.
In this video, I break down:
Players naturally drift to the outside
Elite players do it differently
Simple ways coaches can teach players to attack the middle- Interchangeable Positions with their 2nd player regardless of position driving the Middle Lane.
If you want to create more offense, it starts with understanding this concept.
👉 If you’re a coach or player looking to improve scoring, make sure to subscribe for more content on developing game-transfer skills and better practice habits.
📩 For full practice plans and deeper breakdowns, check out my Substack: The Hockey Planner | Andrew Trimble | Substack
 00:00:00
My Dad used to call this “Shooting Against the Grain”. Its a great tool to use in shootouts or high in the offensive zone, where you can create space and have the goalie track you, leaving the side they’ve left open.
If you are a right handed shot, move your body from Left to Right, or if you are a left handed shot, move your body Right to Left. This will pull the goalie with you across the net front.
As the goalie is still moving and not completely set, you can shoot back against the direction they are headed, and find space in the spot they have vacated.
Its great for Shootouts when you have time and space as you can see in the above clip or in this Pavel Datsyuk goal- Datsyuk "Against the Grain"
But you can also use it high in the offensive zone and a D walks the blueline or on an entry as the defenseman create traffic in front.
Ilya Kovalchuk used to do this very well as a right handed shot entering the zone and cutting behind the middle drive. I couldnt find a perfect example, but here is one where he is moving right to left and he finds a space in the lower half of the net on the goaltender- Kovalchuk First Goal as a Devil
Hope this helps you with your athletes!
By Andrew Trimble
 00:00:00
Two lines on each diagonal side of the blueline. Stagger your lines with opposite colors Red/ Black, Red/ Black, Red/ Black etc.
On the line on one side makes a long pass to far line player who has stepped out from his line as a passer in the sequence. Line 1 (Far line) has 2 of one color and is being defended by 2 of the other color. The passer has to find in the neutral zone the color of the line that passed to him and initiate an offensive sequence from the neutral zone going down the ice towards the far goal. This is the 2 on 2 in action, and the defending team has to communicate, track their players man on man, and defend not only the initial pass but also the rush coming their way through the neutral zone.
Once their is a result from this sequence, whistle blows and the next line begins the next series with a long pass going in the opposite direction.
This is a fun, helpful game- based drill that teaches both offensive and defensive skills. Watch both videos to see drill in action.
By Andrew Trimble
Follow Andrew’s substack, The Hockey Planner, for Free- The Hockey Planner | Andrew Trimble | Substack
 00:00:00
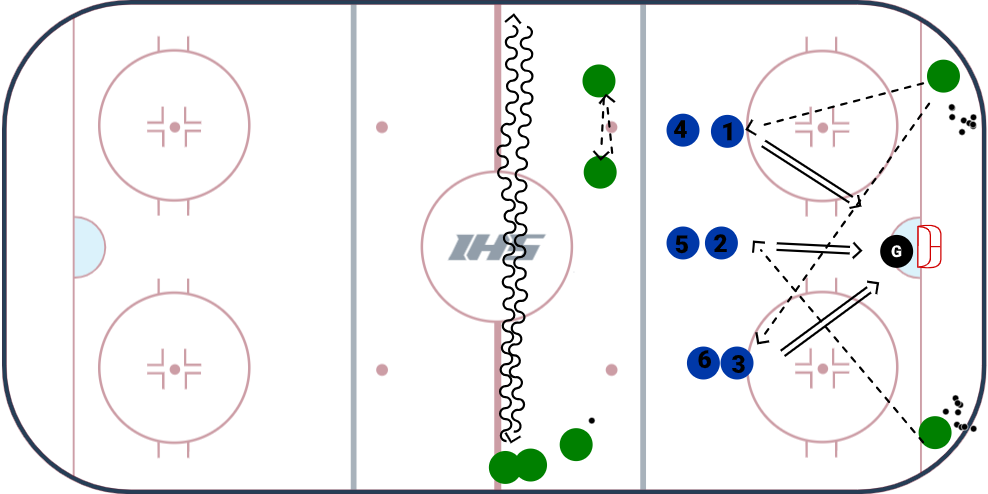
2 v 2 Backcheck Drill
Great drill for U12 and older. 2 lines on each blueline (near dots) on each side of ice. Nets at the blueline facing the Neutral Zone. Pucks on each side. On the whistle starts the drill which begins as a 2 on 0, but quickly evolves into a 2 v 2. After a play made on the net, the next 2 on 0 begins on the whistle, and the previous 2 on 0 backchecks after “touching up” at the attacking blueline. Sequence continues whether it is a goal or not, simply by the whistle. Focus on making fast play, stopping on the net, sticks on the ice, and much more. Watch video to see the drill in action.
Follow the Hockey Planner Substack for more content- The Hockey Planner | Andrew Trimble | Substack
 00:00:00
When I was preparing to coach U13 hockey last season, I wanted to ensure that we were implementing an effective and effecient warm up. The length of warm-ups in youth hockey vary depending on the league, or the tournament the team is participating in. We experienced a range of times from 2.5 minutes - 10 minutes.
In creating our warmup, we did not begin the process by deciding which drills we wanted to include, but rather, asking the question, "what do we want our warmup to accomplish?" We then constructed a warm up that would help us accomplish those tasks.
Our staff discussed what a warm up should accomplish, and we came up with the following points:
I think that many of these points would appear on most coaches lists of what they expect from their warm up. Some were tailored specifically to our teams needs.
For example, developing our goalie's ability to play the puck was a key focus for us this year, as he entered the season terrified to leave the net. It was imporant to me that he received puck playing opportunities as part of our warm up.
So we designed a warm up that would allow us to adress all of these points, knowing that our length of time was typically 5 minutes or less.
First, we decided that the stretching piece could be covered before we set foot on the ice. We completed a team wide dynamic warm up with our playing gear on in the dressing room immediately before hitting the ice. (We also completed this before practices as well).
A couple of players still did a couple of stretches on the ice during the breakout portion of warm up.
1. Players hit the ice.
Players would place water bottles and stick on the bench, and take a hard lap. A couple of players usually had to grab the net from off the boards and move it into position. Our goalie would often complete a little on ice routine and stretch as this time. All pucks were left on the side wall in the neutral zone, players would get into position to begin breakouts.
2. Breakout / 3 on 2.
We had 3 forward lines, 2 defensive pairs, and 1 goalie this year. Forward line 1 would begin the first breakout by dumping the puck in from center. The goalie ( who might still be wrapping up his stretching routine during the first 1 or 2 reps of the breakout) would stop the puck behind the net. The D would pick up the puck, and all five players would break out, offense would regroup in the neutral zone, and come in 3 on 2. After a one and done shot, the next puck would be fired in from center and forward line 2 would compelte the same sequence.
We would vary the number of reps depending on the length of warm-up we were given. For some tournaments where we had a very small amount of time, we would only run three reps, one per line. When we had our usual 5 or so minute long warm up, we would give each line 2 reps, that way each winger had an opportunity to make a breakout pass.
This drill was important for us this year, as it gave our goalie reps stopping the puck behind the net. As mentioned earlier, this was an important area of development for our team, and we saw major improvement in his ability and confidence throughout the season, and I truly believe the extra reps in warm up contributed to his growth.
This drill also gave a few reps of exiting the zone cleanly, which is critical in games. Finally, I think this drill turns the brain on, and allowed us to make decisions at game-speed. Having players execute staying onside during the re-entry , filling the lanes during the 3 on 2, and moving the puck to get a shot off all prep the mind for the game at hand.
3. Shooting Lines / Puck Touches
After the breakouts, a few pucks were left in the neutral zone, while the other pucks were placed into each of the two corners.
Our team was divided into 2 groups, simply called, "group 1 shooters", and "group 2 shooters".
Group 1 shooters are coloured blue in the diagram, group 2 shooters are coloured green. On our team, forward lines 1 and 2 were always our group 1 shooters, while forward line 3 and our D were our group 2 shooters.
The group one shooters would create three shooting lines. The pass would come from the corners to the front of the line, and players would catch, shoot, and move to the back of a different line.
While this is happening, the group 2 shooters are completing 2 sets of hard "there and backs" in the neutral zone. They then have some creative time, where they are encouraged to complete partner passing, or stickhandling routines. Groups would switch after a minute and a half or so. Typically, each shooter got 2 shots from each spot, for a total of 6 shots each.
We also had a team rule that every inviduals first 2 shots had to be on the ice, so that the goalie was getting his stick active, and getting a feel of the ice on his pads.
This portion of warm up hit a lot of our points, one of which is I wanted to avoid standing around time. So many minor hockey warm ups use some sort of horseshoe variation, and I've watched players stand around in line, waiting for their turn, make a pass, skate out, and have a teammate throw a pass way off line, so they return to the back of the line and wait around. I once tracked my U11 son's game warm up, and in the entire warm up, he completed 4 passes, and had 1 shot on net. How is he supposed to be ready for the opening shift when those were his only touches?!
I feel that splitting the team into 2 groups allowed for less standing around time, more shots, and more meaningful puck handling movements as well.
I did find that on the days when we had a full 10 minutes warm up, I needed another drill, and so we would also run 2 on 1's to end our time before puck drop.
So here's the take home message...
We built a warm up that was specific to our team. I am not saying that I cracked the code on running the best warm up possible. But I think we get something right about it... and that something is, don't just do something becuase that's the way it's always been done. Ask yourself, "why do we do it that way"? In this case, we asked the question, "what should our warm up do for us?", and we desgined a warm up that accomplished those things. Keep asking those questions, and make your decisions with those questions in mind.
 00:00:00
Running on-ice skills sessions after the season is over is a ton of fun, but it comes with its challenges. One thing we’ve learned is that the more time you put into organizing the ice ahead of time, the more efficient everything becomes once the players step on. That includes station layout, line placement, and where your coaches or helpers are positioned.
Details matter here. Where the lines start and finish matters. Who is running each station matters. And yes, the vibe matters a ton! If you bring energy from the start, the players feel it, the parents see it, and the whole environment becomes more engaging. When that happens, players learn more, have more fun, and are far more likely to come back!
This station setup borrows heavily from Daniel Broberg’s 7 Steps from Basic Skills to Smooth Power. Being the first day of camp, we wanted a lot of puck touches, but we also wanted to sneak in some of Daniel’s core concepts. There are a lot of turns built into each station, but this is where you can get creative. Challenge edges, change skating patterns, add pucks, put sticks in the air, whatever pushes players to explore movement in different ways!
That creativity extends to your assistants too. Whether you’re using coaches or players to run stations, it’s on all of us to encourage how the drills are executed, not just what gets done. The habits inside the reps are what matter most.
At the end of the day, it’s a game. It’s supposed to be fun!
Station 1: Players execute cutbacks with a puck and shoot, take a second shot from the line, then play out the rebound
Station 2 (Head Coach): Skate around the opposite faceoff dot and back, working through two-foot glides, one-foot balance, lunges, and inside-to-outside edges
Station 3: Edge work around tires, pick up a puck, then pass to the previous player for a one-timer (stay in front to receive a pass from the next player)
 00:00:00
The Corner Pick Up focuses on puck retrieval, quick passes, and zone attack.
SET IT UP:
Coach positions just inside the red line with pucks.
Players are split into 2 teams, lining up behind the blue line.
Puck is sent in to initiate a battle.
RUN IT:
Coach sends the puck to one corner or the other. THAT side team is offense. Once the puck is released, both teams enter the zone MINUS 1 player. This Player (4 in the above diagram) comes to the center of the blue line and will be the point. They can skate center to boards, but NOT into the zone.
The First three players (offense) attempt to score and can use their blue line skater to pass to, regroup, and change positions (they can enter the zone if replaced by one of their teammates).
The second three players (defense) attempt to gain control of the puck, and then pass to their blue line player. When that happens, the teams switch roles, and the drill continues until one team scores.
Keep shifts and active drill to 2 minutes or less.
NOTES:
You can vary the player lines with different numbers - 3v3, 5v3, 5v4, etc.
Can include a net and goalie at the red line for breakout scoring opportunities after defensive transition, as indicated by the shadow goalie and net in the above diagram.
Even numbers, (3v3) with blue liner = basic zone work
Odd Stacks (3v5) = work on defensive zone returns and play structures
Can also be used to work on and train Power play (PP), or Penalty kill (PK)
Make sure to include good net front presence, reinforce keeping sticks on the ice to block passing lanes, Encourage communication!
 0:00:55
It’s beneficial to have a visual target as a release point (such as the faceoff dot). Making body adjustments, ensuring and registering full rotations, and by getting your body & weight transferred to the target, will all help add power to your shot!
End of content
No more pages to load
copyright (c) 2026 The Coaches Site