
We must create practice situations that are ideal for learning and performance.
The more time-on-task there is in practice, the better our players will develop their skills. We want to develop practice plans that maximize movement and minimize standing. As coaches, we want to minimize talking and giving instruction, and get the players moving. This can be done by following “The Coaching Model.” Ideally, we want our players to be active with skills or drills for 15 – 60 seconds followed by some rest, similar to a game.
The Coaches Model
There are four phases of the Coaches Model:
- Demonstration Phase
- Practice Phase
- Response Phase
- Feedback Phase
Demonstration Phase
During the demonstration phase, the coach explains and/or demonstrates the drill and/or draws it on the whiteboard. It is important to know that young players have a limited ability to understand verbal information, therefore we must keep words to a minimum. The best way to learn a skill or drill is to watch the skill/drill to get a general idea of the skill.
- Demonstrate the skills/drills as much as possible. With multi-player drills this is better done using a whiteboard.
- Seeing a skill is better than hearing a skill.
- Focus the players attention to the parts of the skill/drill we want them to see.
- We can do this by using teaching cues to:
- Help focus the players attention.
- Enhance the memory of the player.
- Reduce words needed to describe a skill.
- Teaching cues are 1, 2, or 3 specific instructional points that help the players understand the important parts of the drill/skill.
Practice Phase
This is where the players will develop the muscle memory for skills and drills. To do so, we must design drills as close to game-like as possible. In skating coaching, there are classic examples of coaches using non-game related drills:
- Gliding/balancing on one-skate for extended periods of time.
- Moving the arms forward-backward.
- Teaching a long recovery with the skate coming under the mid-line of the body.
With team drills, it is important to get as many players involved in the drill as possible, just like a game.
Response Phase
We must create practice situations that are ideal for learning and performance. Eliminate fatigue at beginning of practice, and have conditioning at the end of practice. The warm-up should be of low to medium intensity to prepare players for higher intensity drills.
Fatigue inhibits fine muscle movements, ie: passing, receiving passes, shooting, and puck handling. And remember, goalies need a rest because they can become desensitized by too many shots. When former NHL goalie Glenn Hall was the goalie coach for the Calgary Flames, he counted the number of shots goalies would face in practice. It was typically between 300 – 400.
Give players, and/or the team, goals or objectives on as many drills as possible. This can be things such as: “hit the net three out of five shots,” or “goalies save three of five shots or make the shooters miss the net.”
Never use exercise as punishment. It is misguided and inappropriate to get players to do push-ups if they miss the net or to make players skate if they did something wrong or as punishment for a poor game. It metaphorically tells the players “You did something wrong, now you have to do something that is good for you.”
The “best” punishment for inappropriate behaviour is inactivity. If players are misbehaving, we could put them in the penalty box for a “time-out” (for younger players). If players do not perform a drill correctly, it may not be their fault because they may not have understood the drill.
Feedback Phase
The better the feedback, the better the learning & performance. All the research agrees: feedback is the strongest and most important variable controlling learning and performance. The ability to provide meaningful feedback is the most important ability for a coach to possess.
Give immediate feedback, or as soon as possible. Give positive feedback. Tell the player(s) what to do and avoid telling them what not to do. Give feedback when a player is successful, not only when he/she is unsuccessful.
“Good pass! You had your head up, you looked at the target, and you hit his/her stick.”
Design practices for maximum movement
Many years ago, I was hired to consult for a summer hockey school. One of the things I wanted to do was a time-motion-analysis study of the skating coaching at the hockey school. I watched 10-skating coaching sessions and followed one player in each session for the entire time. I timed the players on the following:
- Time standing in line waiting to do a drill or listening to the coach.
- Unproductive movement, ie: time spent moving forward in the line to do the drill.
- Time-on-task, ie: the time the players were actually doing the skill or drill.
Following are the results of the time-motion-analysis study:
- Average length of a skating coaching session = 70 mins
- Standing in line = 50 mins
- Unproductive Movement = 10 mins
- Time-on-task = 10 mins
- Average amount of time-on-task = 6 seconds/drill.
These sessions were the “typical” skating coaching sessions where the players were in five lines at one end of the rink, with approximately six-to-eight players in each line. The skating coach would describe and demonstrate to the players what he wanted them to do, then the first player in each line would proceed doing the drill/skill. The coach was timed talking as long as five minutes in some cases. Because of the size of the lines, the usually started the drill at the top of the face-off circles. Then they did the drill until approximately the far blueline, and glided to the end of the rink. As mentioned above, it took them approximately six seconds to complete the drill. Six seconds is not enough time to acquire a skill.
A better way to conduct a skating session is to have two groups of players in opposite corners. Demonstrate the drills keeping words to a minimum and using teaching cues, then get the players to do the drill from one corner to the net, or the opposite corner.
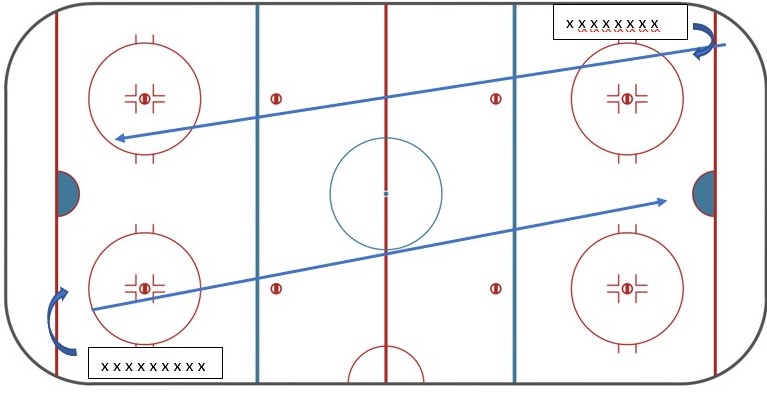
Ideas and drills to get more players moving
Have players line up along the sideboards instead of in the corner and behind the net (see above diagram). This does two things:
- It prevents players from getting hit by a shot.
- It makes players start the drill in the corner therefore using more ice and increasing time-on-task.
More nets on the ice
Have as many nets on the ice as possible (many arenas have extra nets) so that sometimes players are shooting on goalies, empty nets, or on a net with a shooter tutor. Players do not always have to shoot on goalies. With more nets on the ice, this means more players can be skating, handling the puck, and taking a shot, and goalies may not get desensitized by too many shots.
Get more player involved in drills
With a team, doing a drill with two players skating and shooting on the goal (such as a “horseshoe” shooting drill), means there are a lot of players standing still. Instead, have a group of players in each corner of the rink with two or three players skating, passing and shooting in a “horseshoe shooting” drill. Group one comes out of a corner and they skate and pass inside the blue line (around the face off circle) making three passes before shooting, and group two comes out of the opposite corner and they have to skate and pass into the neutral zone then back into the offensive zone to shoot when group one has taken the shot, they have to have their heads up to see when the goalie is ready for the next shot. Or they shoot on the empty net or a shooter tutor.
Game-performance drills with as many players as possible
One of the best ways to design drills is to watch games and see movements that can made into drills. An example is a 1-on-1 battle drill, but have other players involved so that if the offensive players wins the battle, the drill turns into an offensive zone drill. If the defensive player wins, it is a break-out drill.


")


