Hockey Practice Drill: Timing Drill - D Stretch Pass x2 - Red Line Post Up & NZ Wheel - 3 Finishing Variations
Drill Setup
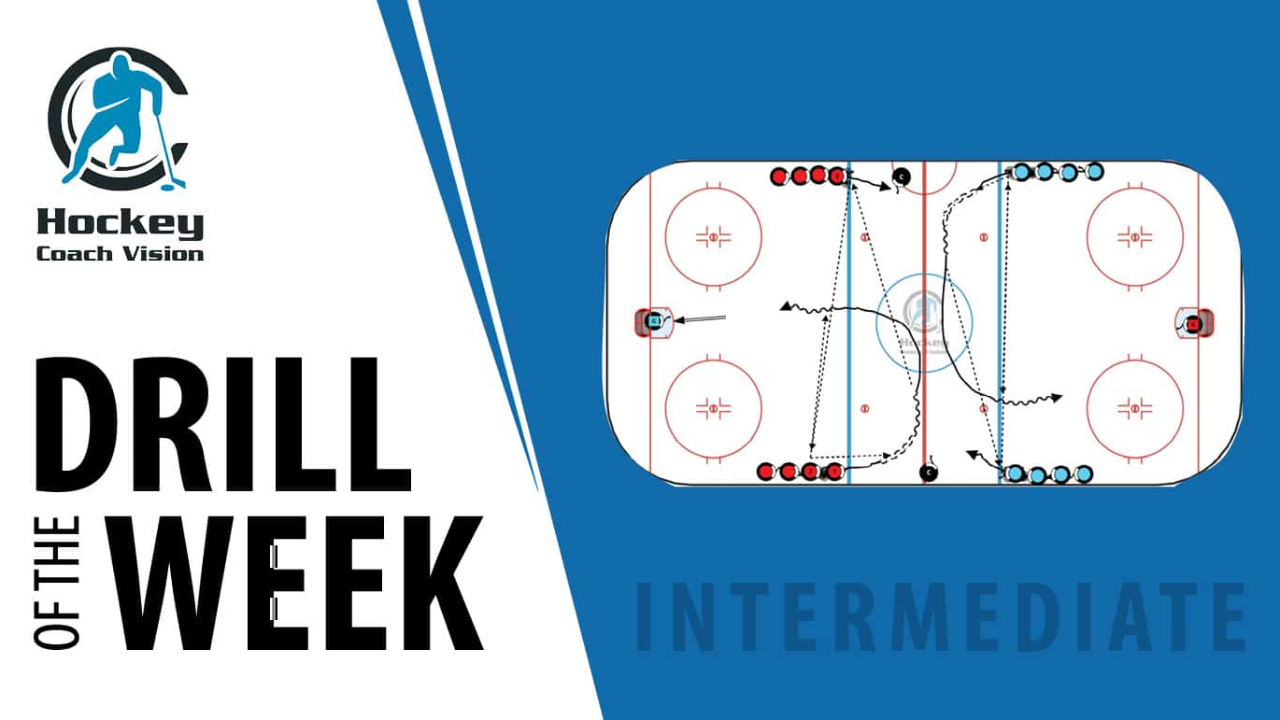
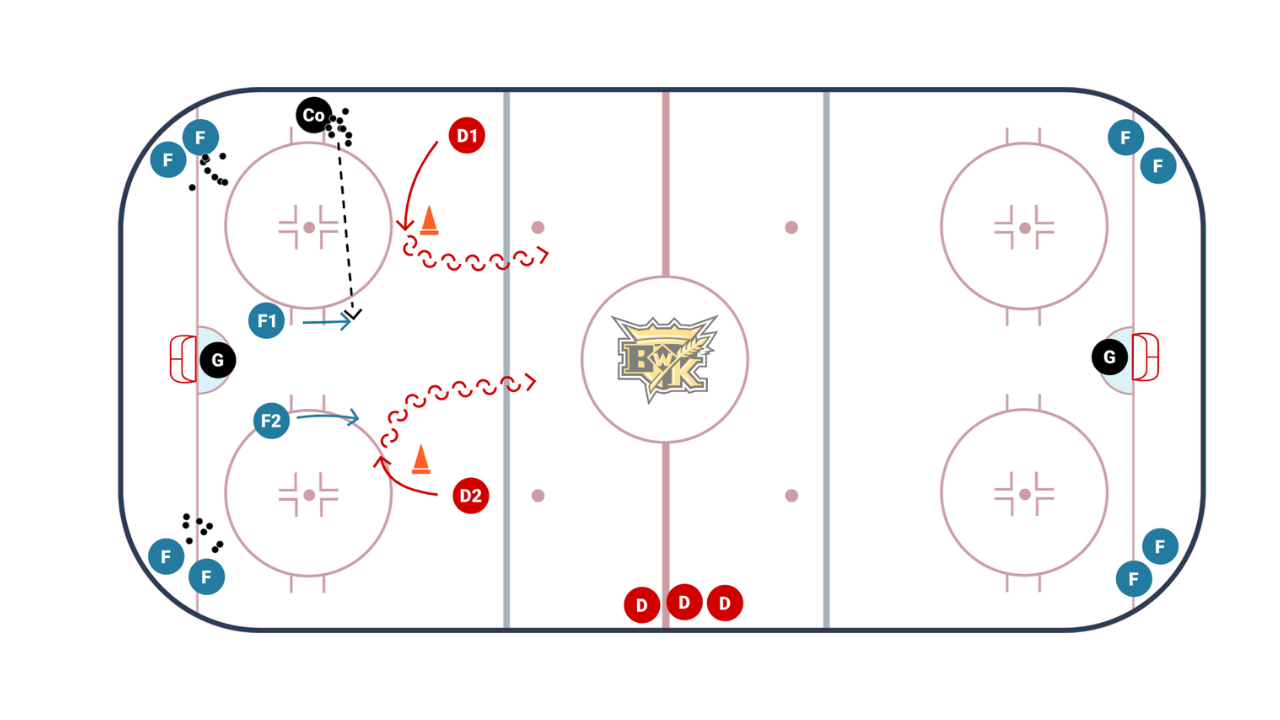
- In diagonally opposing in-zone faceoff circles, 1 Defenceman starts on the dot facing the the top of the circle.
- Two Forwards (F1 & F2) line up in the corner facing the defender that is at the other end of the ice. F1 starts behind the lower hash mark. F2 will be behind F1
- Coaches are in the corners directly behind the defenders with pucks ready. Place a puck at the bottom of the defender's circle, have another puck ready to replace it as the defenders are going to be making 2 passes.
- Goalies in net at either end.
Step 1: Strong Side Stretch To Post Up
**This is a timing drill that is gauged off the speed in which the D get to the bottom of the circle and move pucks up ice. Allow for them to get their bearings but push them to increase their intensity and sense of urgency as they work through their reps.**
- On the whistle D will explode off the faceoff dot to the top of the circle then transition forward to backward motioning to the middle of the ice and following the faceoff circle toward the outside. D should open up their hips as they pass the inside hash marks. This is where they will pick up the puck sitting at the bottom of the circle and get up the wall.
- On the same whistle F1 will race to get, ideally, to the red line. D are not to wait if F1 is not posted up at centre. The D are to make a hard, flat pass when they're set and ready. F1 comes to a full stop and should begin lateral crossovers as the puck is coming toward them to start momentum back up ice. F1 will head down and shoot, stopping at the top of the crease, when play is over F1 should be ready for F2's shot.
- Coach places a second puck at the bottom of the circle for the D.
There are two incredibly important Coaching points to reinforce with your Defence here.
- Gather Information - Have quick transitions and make sure you shoulder check to make a more informed decision. This is a habit that more and more players are getting away from when that simple act of looking over one's shoulder provides the most important component that any one player needs to be as effective as possible. That particular area and the route they are taking starts by heading into the one area of the ice we don't want to be, "The Cemetery". Coach Naurato has taught the importance of getting pucks out of that area as that's where plays go to die, meaning we are likely going to be met with pressure in a game. I understand this isn't the offensive zone but it is the principal of getting there fast and moving that puck with purpose, and for defenders we can be more effective at getting pucks up ice if we approach that area with a sense of urgency.
- Keep Yourself Safe - Make sure that your defenders are making passes from this area of the ice with a strong base, meaning two feet planted. Reason being this is prime real estate for checks being finished hard. In a game, you're heading up ice, and your opponents will want to get above and head down ice at you to force a turn over by being physical. If you have your head down, are making passes while crossing over or even worse off one leg...it can facilitate injury.
Step 2: NZ Wheel Timing
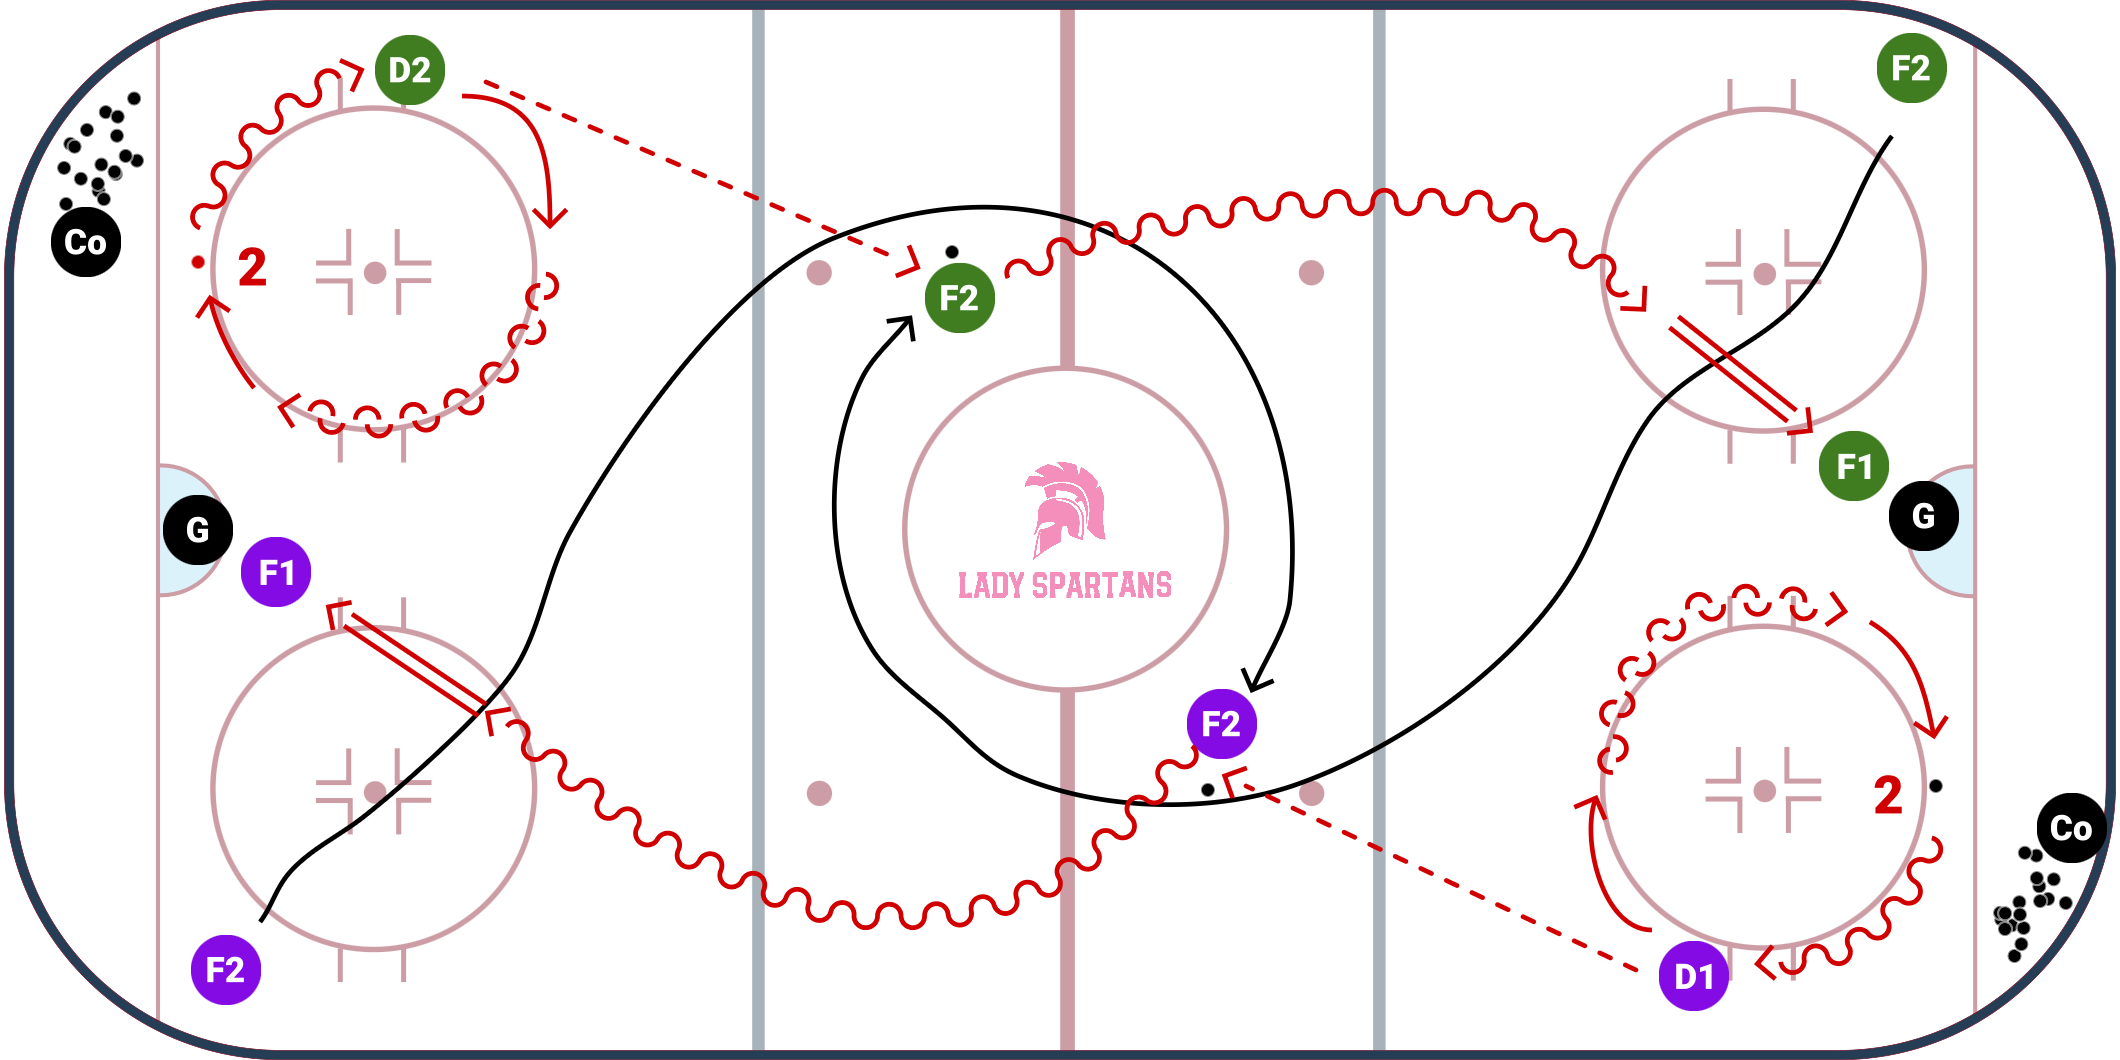
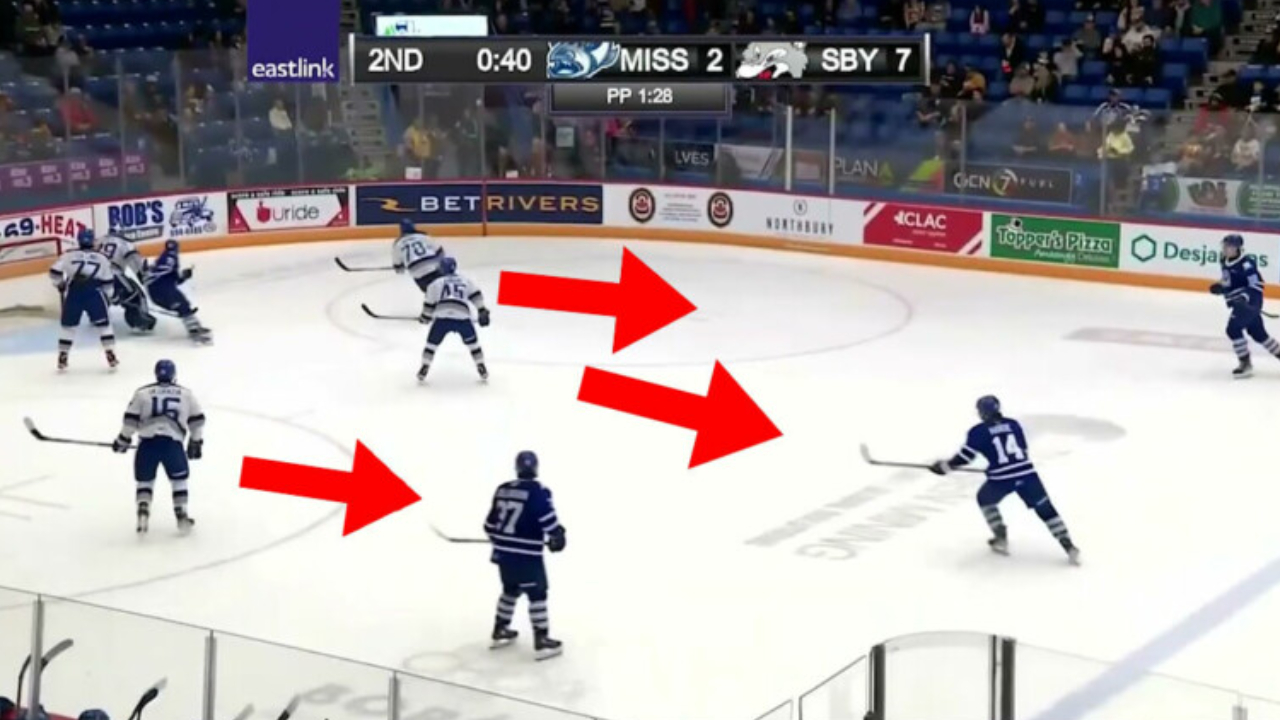
- Off the first whistle, F2 will begin slowly moving up through the zone toward the middle and up ice, watching and timing as they gradually pick up speed heading around the far side of the centre circle and hit full speed wheeling through the neutral zone.
- The timing taking place by F2 is based on the reloading of the D after they make the stretch pass. The D will back peddle around to the bottom of the same circle making sure to assess where F2 is before opening up to gather the puck and heading up ice.
- Goal here is to hit the forward in stride and immediately follow the play, motioning toward the middle lane before breaking to the wall and stopping at the blue line.
- F2, staying to the outside with speed, will head in and shoot as F1 screens.
Step 3a - Drill Finish Option 1 - D Follows Play / Shot From Point Off Rim Release
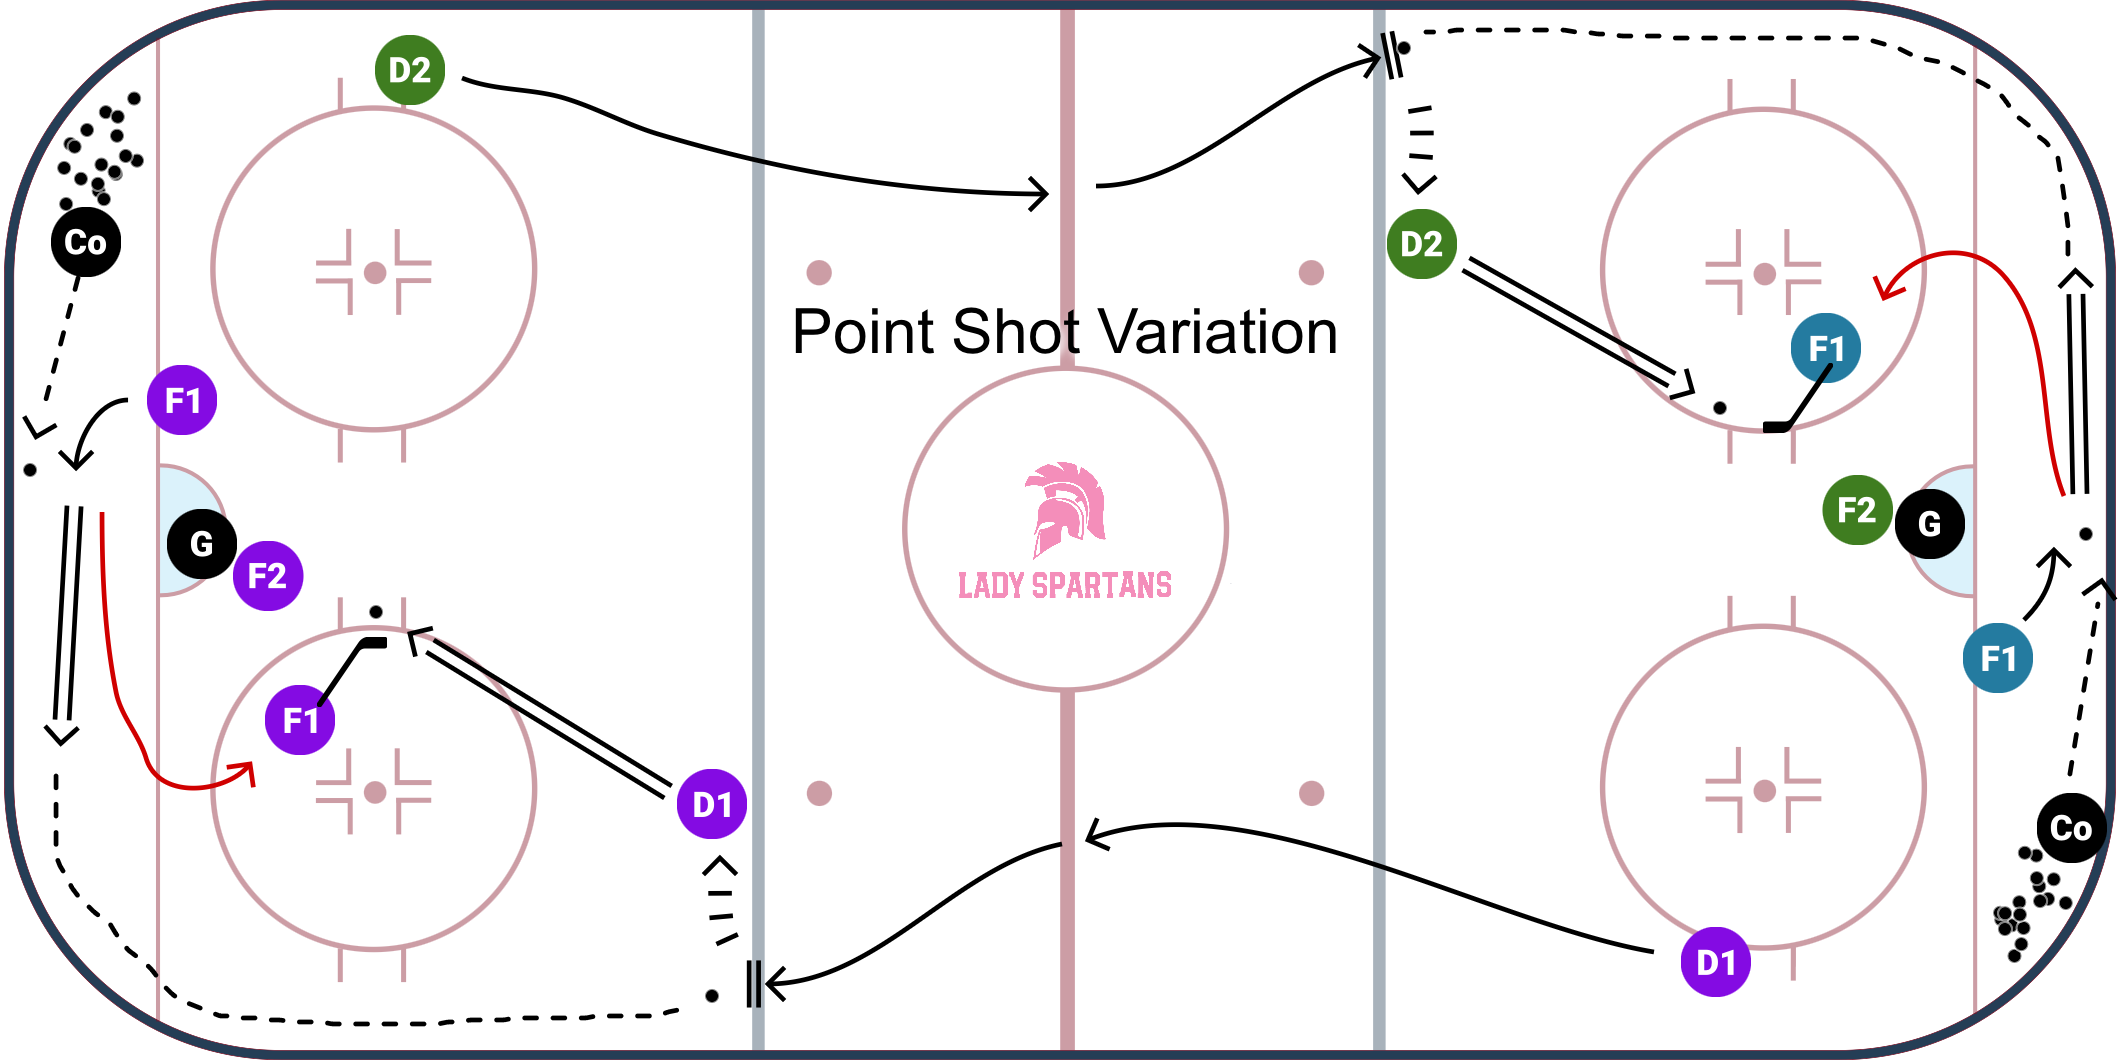
- After F2 shoots, if there is a rebound or a skilled play to be made Coaches can allow for the play to continue at their discretion. If deemed over, Coaches will verbally give that signal and will proceed to release a puck off the end boards in such a way that it rests behind the net. F1 will then motion behind the net and hard rim release up to the D who followed the play.
- It is now F1's turn to work on timing. In this case it is to time the shot coming from the point and getting a stick in the shooting lane to attempt a tipped redirect as F2 screens.
Step 3b: Drill Finish Option 2 - Angling 1on1
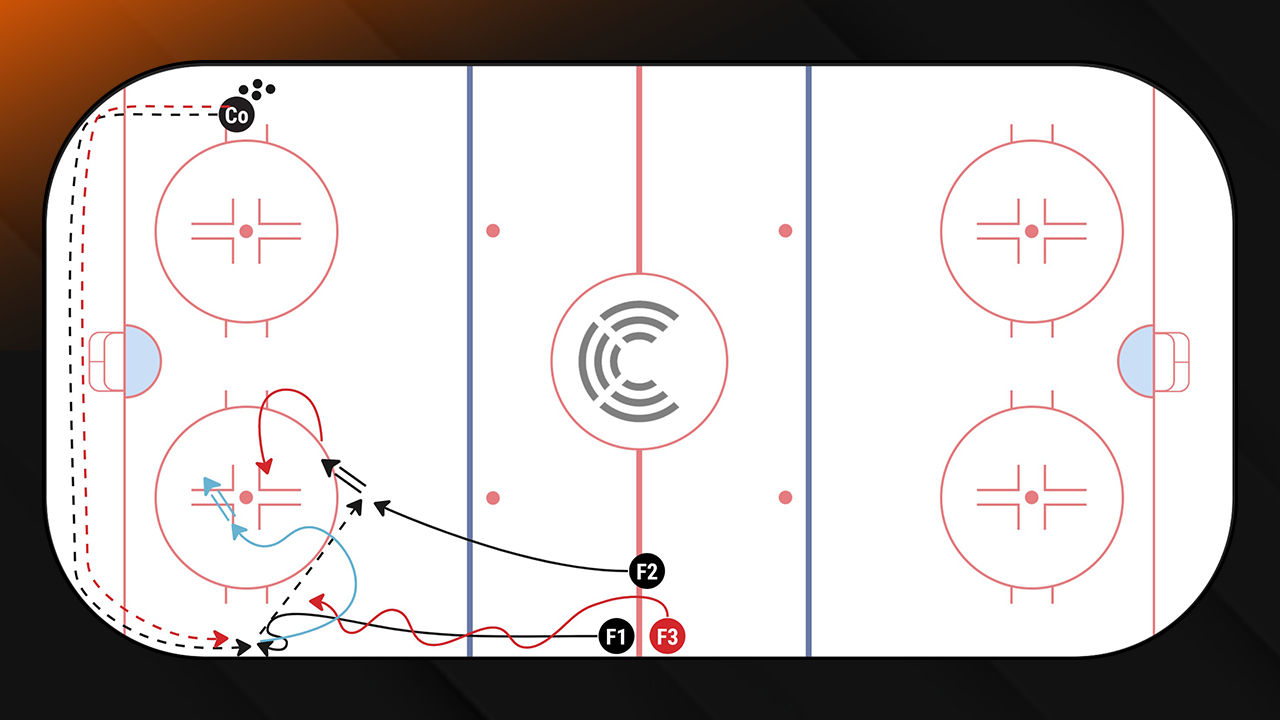
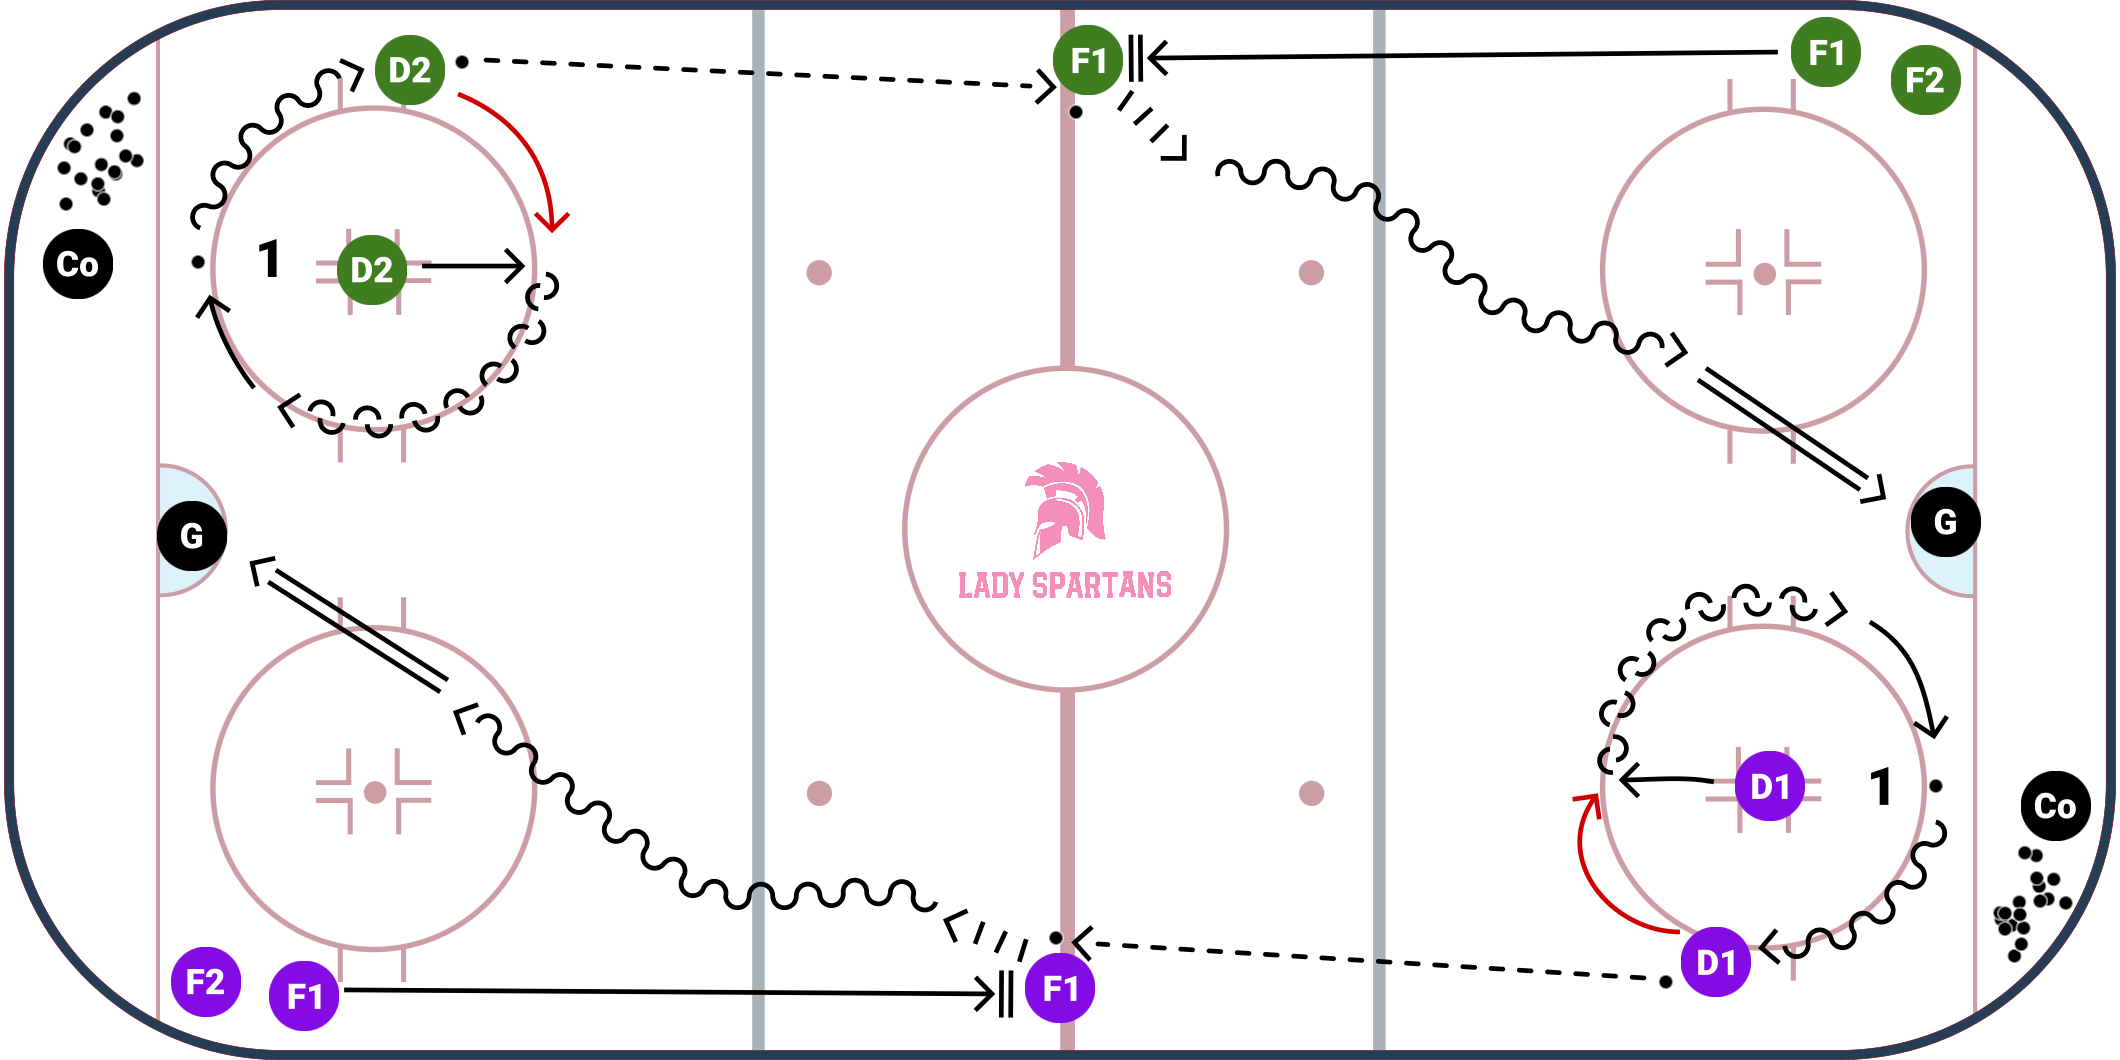
**Drill is shown below starting at the point where the D has made their second pass to a wheeling F2**
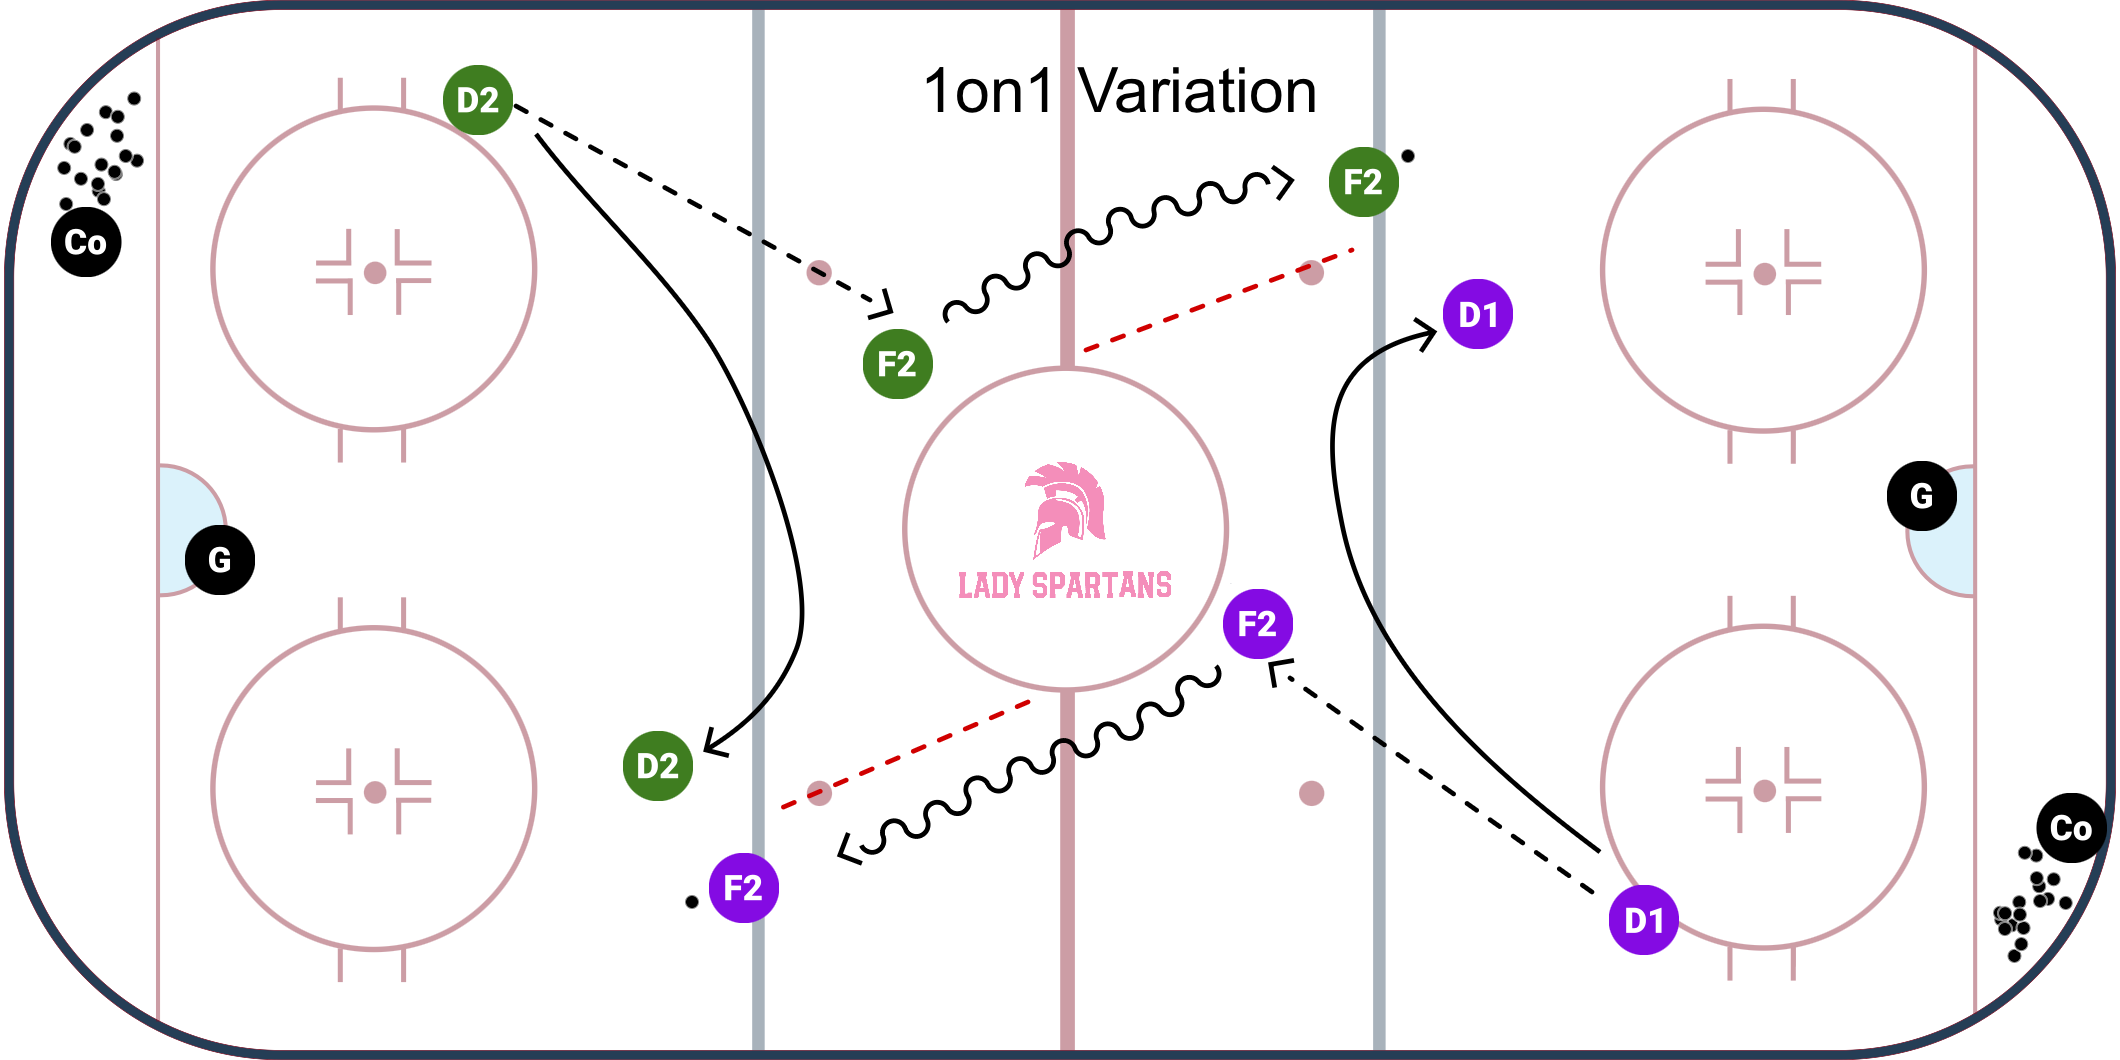
Note - In the 1on1 & 2on1 variations, F1 is done after they shoot.
- In this 1on1 variation, after the D hit the forward wheeling through the NZ, they must work across to the opposite side and play out a 1on1.
- F2 MUST stay outside the faceoff dots until they cross the blueline
- Coaches can use a bingo dotter to show players the lane boundary. Cones shouldn't be used as they can effect the path F2 takes as they build speed around the centre circle.
Step 3c: Drill Finish Option 3 - High Zone 2on1
**Drill is shown below starting at the point where the D has made their second pass to a wheeling F2**
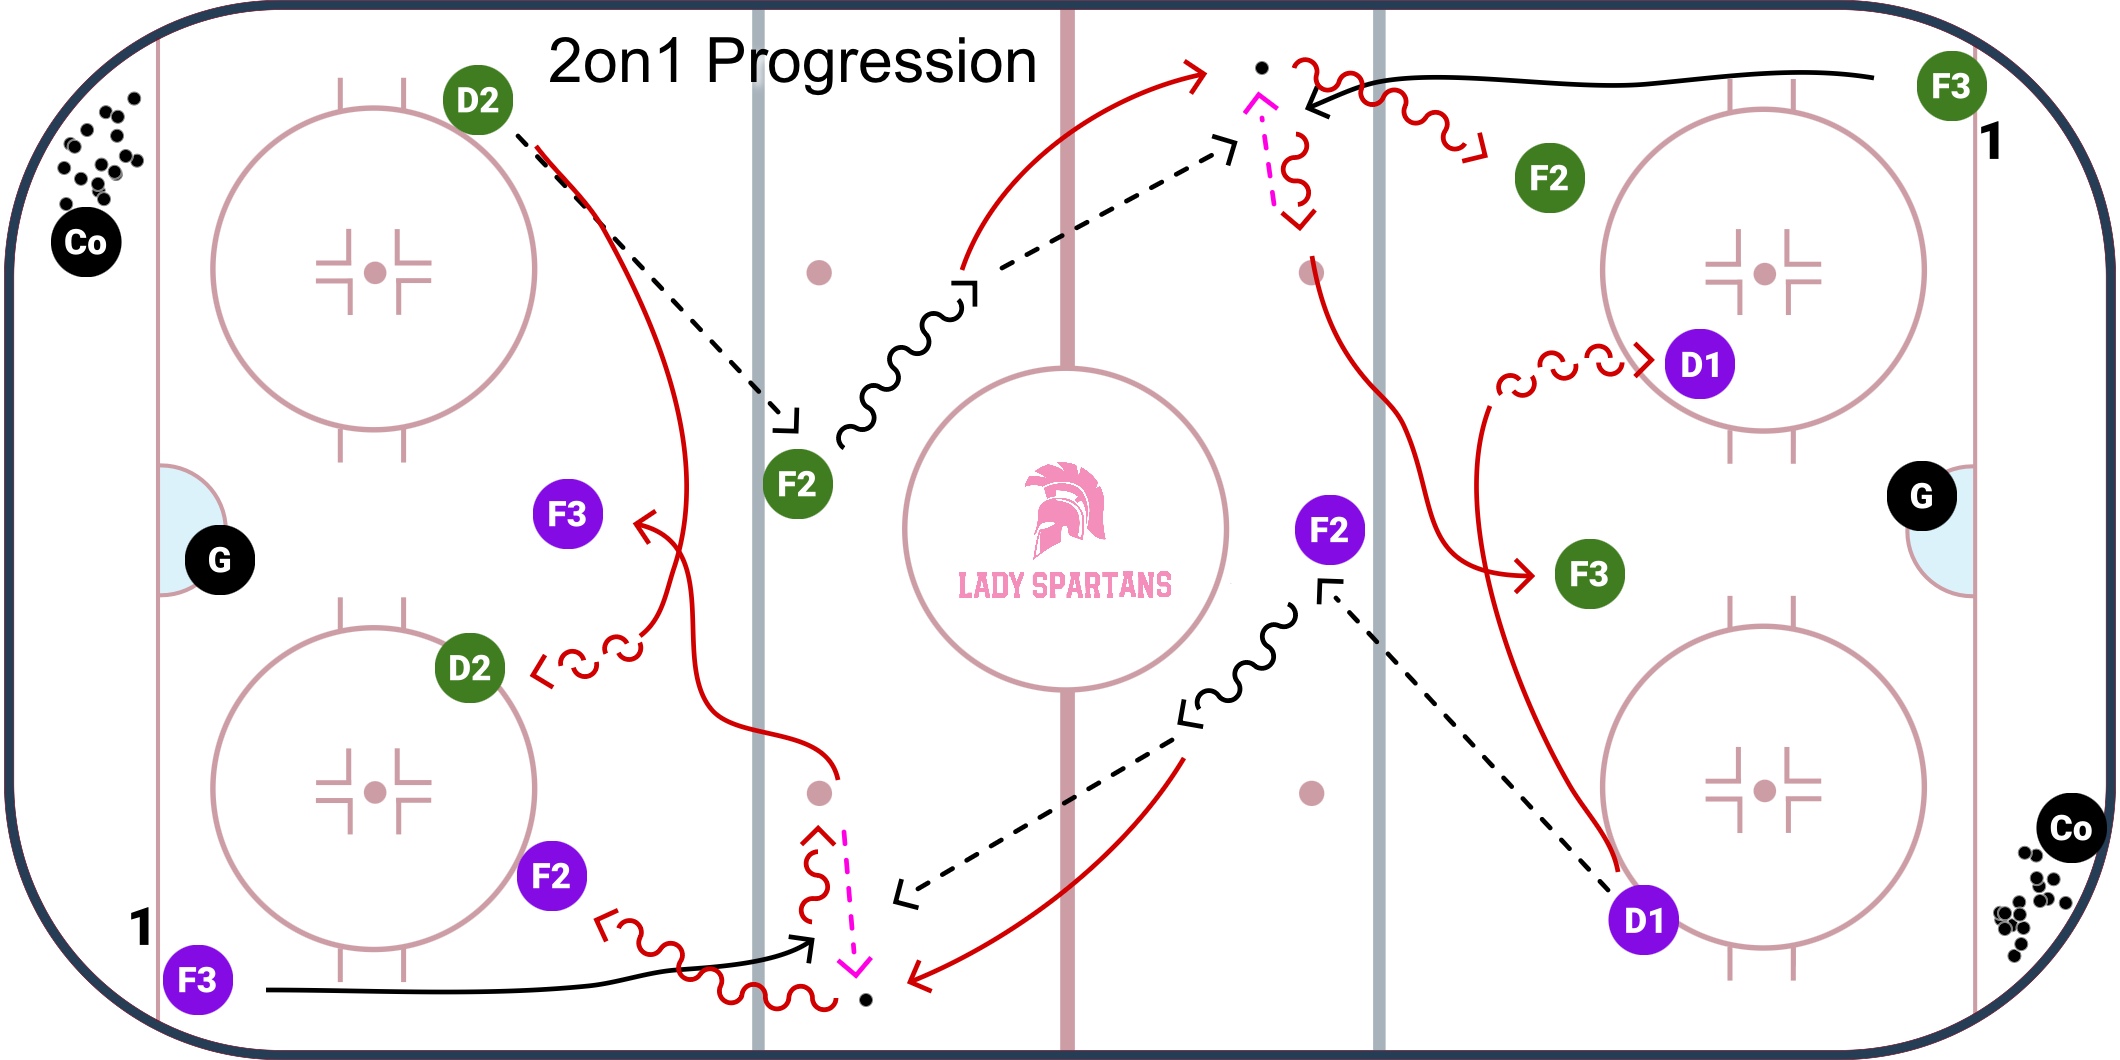
Note - In the 1on1 & 2on1 variations, F1 is done after they shoot.
- This 2on1 progression requires a third person. So F3 is remaining patient and will have to work on timing as they need to be just exiting the zone when they receive a pass from a wheeling F2.
- When F3 receives that pass, they are working toward along the blue and middle lane and making a drop pass to F2 as they take F3's lane on the Zione
TOP PICKS |
